It’s been right at 5 years since I developed the Wolfer style smoke-cooker and I’m now more confident than ever that it can hang in there with anything this side of climate-controlled commercial smokehouses/thermal processing units.
As some of you may know by now: I have been poor and/or frugal my entire life. Have been associated with agriculture, and with the meat business in particular, since my early teens. And, I have practiced the home further processing of underutilized (comparatively inexpensive) red-meat cuts since the early 1980’s. It was with this background that I first viewed the Barbecue Pit Masters TV show some 6 years ago. The show’s cast occasionally mentioned the roots of frugal outdoor smoke-cooking, but the extreme subjectiveness of finished product judging left me wondering if there was really anything serious happening there. In order to satisfy my curiosity I convinced my wife to travel close to 100 miles with me to observe a small town barbecue cooking competition. After having been there, I began to suspect that BBQ contests were primarily about multi aged partying, something fun for retirees to do, tourists dollars and an attempt to sell several different associated BBQ products or how-to training. Yet, I was still drawn to the idea that lots of people were interested in cooking underutilized red-meat cuts; so I wanted to contribute in my own little way. My way is frugal, science based, practical and not for profit.
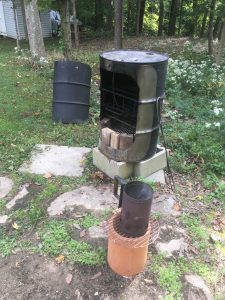
First luck: My buddy got me two identical and empty closed-end cutting oil drums for free. After attempting to burn the oil out of them, my plan was to exploit the existing attributes of a closed-end drum to create a comparatively high functioning backyard smoke-cooking unit. In order to accomplish that I was hoping to draw upon my past experience/knowledge at operating both small and large commercial smokehouses. Luck # 2: The barrel ribs stood out to me as becoming rack levels and the barrel top bung holes as being used for smoke venting, water refill and mid-cook refueling. With those thoughts in mind I set about cutting out a large section of the front of a drum; with the opening centered on where the two top bung holes aligned. Luck # 3: After the access to the interior was cut out I realized that about half of the matching drum was needed to cut a shroud big enough to adequately overlap the opening. That meant that each cut down barrel could supply two cooker shrouds. I cut both ends off the second drum just below the barrel hoops. Luck # 4: The top and bottom drum circles fell cleanly out after cutting; providing tight fitting pieces to thicken the floor of two different cookers. Thickening the cooker floor was initially thought to help keep it from burning out. Luck # 5: The barrel hoops themselves were even eventually flattened, welded together and used down the fuel/flue pipe to flick partially lit charcoal onto the forward sloping fire grate. Luck # 6: As two shrouds were cut out of one barrel the vertical seam was also cut out; thereby wasting only about 2 inches of barrel on both sides of it. Overlapping raised barrel ribs help guide the shroud into place. In the beginning I was not sure about how to best fasten the shroud in place during operation. I tried putting straps around the entire barrel in an effort to form a very tight seal. But, with experience at running the unit I realized that one bolt and wing nut at both the top and bottom center of the shroud was optimal. Two thermometer probe size holes were drilled through the shroud at cooking level. I actually had both dry and wet-bulb thermometers in the beginning and read the chart to learn that the cooker was operating at around 19% relative humidity that day. Luck # 7 was that with cooking experience I learned that a wet bulb thermometer was not useful and that by laying an open hand on top of the working drum I could compare the heat level to the dry-bulb thermometer reading. Then after a while looking at the thermometer was no longer necessary to adequately judge the level of cooking heat in the chamber. One 3/8 inch diameter hole was drilled in each side of the drum near the top hoop for additional smoke venting. Another vent hole was drilled in the back side of the fuel/flue pipe near its top end. For combustion air, seventeen 3/8 holes were drilled through both the shroud and drum; spaced out near the cooker bottom. Luck #8 came when both air supply and vent holes performed very well. That was especially lucky since they were merely educated guesses. Luck # 9 is that the relatively small circular nature of the unit precludes the existence of cold spots within any given level of the cooking chamber. The hot pipe is located to the back, but slow – steady venting around the shroud draws radiated heat forward. There are also small vent holes drilled into the brass fitting that’s screwed into the small bung hole.
The cooker body and shroud were the easiest sections to fabricate, when compared to the heavy internal components. Luck # 10 was that 3 inch diameter gas pipe fits nicely around the large, back of the cooker, bung hole and standard size charcoal briquettes are small enough to be easily dropped down that pipe. Luck # 11 was that my plumber nephew helped me weld on the first fuel/flue pipe and then advised me to buy an inexpensive, small wire-feed mig welder that I could quickly learn to use. Rebar racks were welded in at both barrel rib levels and onto the fuel/flue pipe so that the permanent interior heavy metal components all holds securely when the cooker is stored in any position. Luck # 12 was finding brass gas compression fittings at a plumbing supply house that screw into the small barrel bung. A flare fitting nut then attaches the piece in the barrel bung to soft copper tubing, so that water can be easily resupplied to the cast iron water pan. If you want further explanation of this smoke-cooker’s fabrication (Click Here).
When I started out using the cooker I tried burning charcoal and wood chunks on the barrel floor, but soon realized that there were serious combustion air issues. That’s when I cut a “bird’s mouth” in the lower end of the fuel/flue pipe to sit a fire grate on. Luck # 13 was finding Weber 17 inch diameter fire grates at “big box” home improvement stores. Luck # 14 was that there’s just enough room to stand a ring of standard size firebricks on end, around that diameter fire grate. The front of the fire grate sits on two thin firebrick pieces stood on edge. The thin bricks sit up against two of the standard size firebricks. Luck # 15: The large gaps between the outside side of the firebricks allows ample combustion air to enter from drilled holes in the barrel; while the tight together inside surfaces of the firebrick ring readily absorb heat that is radiated out firebrick tops and backs. I didn’t fully understand Luck # 16 for a long time, but the combustion rate is slowed by smoke that is backed up in the top of the drum’s interior. Luck # 17: Much of the smoke and heat generated on the fire grate exits directly up the fuel/ flue pipe. As heat travels up the heavy metal pipe some of it is absorbed into the thick metal, then that heat both conducts into cooking rack rebar; plus some of it radiates slowly into the cooking chamber. Luck # 18: Charbroil deep-dish cast iron water pans are available at retail stores or online.
With much of the briquette & hardwood combustion heat immediately venting to heat a heavy metal pipe, having a large cast iron water pan over the fire grate to diffuse heat, with fire bricks & rebar racks absorbing – radiating and/or conducting heat into product, the tremendous ability to refuel & add evaporation water without opening the unit mid cook, a 60 pound meat cooking capacity and a $240 materials & supplies cost —- the Wolfer style drum smoke-cooker truly is in a class by itself. It is a cost effective hybrid classified somewhere between traditional direct heat and off-set smoke-cookers.
Luck # 19: Large fibrous casings increase the units cooking capacity, act as a filter to prevent over-smoking in this very smoky pit, they hold enough moisture around cooking product to facilitate collagen gelling, they form a smoky protein-skin all along casing walls, they enhance the smoke-ring look development and allow for the cooking of more uniform product i.e. no bone or excessive fat causing uneven cooking.
Regular charcoal briquette consumption: Two full charcoal chimney cans partially lit at start-up then after about 4 hours partially light 2/3 of a chimney can approximately every 2 hours.
Unfortunately, once I came out of the barrel my luck ran out. All that luck had excited me to the point where I bought 15 new barrels from a local container company and fabricated 10 cookers from them. My thought was to sell them at cost just to introduce this hybrid. But, no one has ever seemed to see what I do in them. I did however get one early adopter; who uses his without casing the meat. Since I continue to use one cooker that left 8 of them sitting out in my shed for four years. This Spring I gave the remaining units away to family and friends. The ones that got their firebricks and hooked up the water tube love them. And, one nephew recently followed the linked blog post (Click Here) to cook in large fibrous casings.
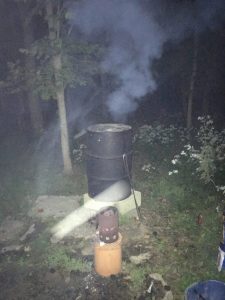
This “out of this world” pic that I inadvertently snapped at 4:30 one morning might somehow be luck # 20. When I scroll into it on my I-phone a round orb streaks in from the lower left. Also on the left side, smoke is either unnaturally falling to the ground or mist is rising up out of the ground. Most people see a skull profile in the smoke above the cooker. And, If you expand the picture and look inside the chimney starter opening you will see what looks like a little face. I think that the white weed flowers showing up well in the darkness adds another spooky touch. Luckily the cook start-up was over when I took this picture. After looking at it I went inside and back to bed until after sunup.