It is most cost effective to build 2 cookers at a time because it takes 3 drums for every 2 made.
Buy 3 new, closed-top 55 gallon drums that have not been coated with anything on the inside.
Use a sewing tape measure for finding exact locations on rounded barrel surfaces.
Cut ends off of one drum using a circular saw that has a carborundum metal blade on it. Make cuts just below the barrel rim. Cut the raised bung hole treads out of the top drum end. Set ends and rims aside for the time being.
Cut the remainder into 2 shrouds that are 34 inches wide and are the height of the entire barrel. Make sure to cut out the side seam in the process, it should be about 4 inches wide.
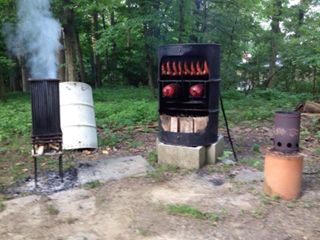
On cookers:
Make a center mark on front of cooker that lines up with the top bung holes. The smaller hole is the front of cooker.
Measuring off both sides of the center line cut out an access opening that is 21 inches wide, 3 inches from the top of the drum and 4 1/2 inches off the bottom rim. Make sure to round the inside corners of the access hole by using a hand-held grinding wheel. Discard the access cut-out.
Cut 28 inch long pieces of 3 inch inside diameter (ID), schedule 40 black iron gas pipe. At 4 1/2 inches from one end of a pipe, cut an opening large enough to allow lit briquettes to be dropped onto the fire grate. The back of the fire grate sits on the bottom of the notch cut in the pipe. Drill a 1/2 inch diameter vent hole in the top-back of the pipe; very close to the cooker top.
Leave the small bung hole plug in to protect the threads from welding “spray.”
Place the cut-out barrel ends on the floor of cookers; this thickens the floors. Drill a 3/8 inch diameter hole through the center of both the cut-out end and the cooker bottom; then temporarily hold them in place with a bolt and nut attached through the hole.
Turn the cooker on its top and weld the 3 inch pipe around the large bung hole. The notch in the pipe should be facing straight at the cooker’s access opening. Do not forget that the bottom is now up when attaching the fuel/flue pipe. I use a small mig, wire-feed welder that has both minimum and maximum power settings. Maximum is used to weld pipe to rebar or rebar to rebar and minimum is used to weld the pipe to the cooker top, rebar into barrel ribs or the shroud holding bolts to the cooker. Weld back rack pieces of rebar to the pipe to increase cooking heat transfer via conduction. I use a rack configuration that is good for cooking 10 pound chubs, plus I later added more on top for smoking linked sausages.
Drill one 10mm hole above and one below the center of the access opening. These holes go through both the cooker wall and the shroud. Weld short bolts into the holes from the inside of the cooker. Put nuts on the bolts when welding, to both hold them in place and to keep welding spray off the threads.
Use tin snips to round off shroud corners.
Bolt the shroud in-place then drill 17 combustion-air holes through both the shroud and cooker. Place the row of holes 1 1/2 inches off the cooker bottom, on 1 3/4 inch centers.
Drill 2 thermometer probe size holes in the shroud that are 3 1/2 off the front center (one hole on each side of center) and 4 inches below the top rim.
Drill 2 vent holes close to the top rim, they should be on the side centers of the cooker.
Screw a brass flare fitting into the small bung hole. I drill 6 small holes in the brass fitting body for more venting out the cooker top. Attach a cut and flared length of copper tubing that reaches to the bottom of the deep-dish cast iron water boil-off pan on the bottom rack. The flare fitting and copper tube are easily removed from the part that is threaded into the drum; facilitating product loading and removal.
Buy 12 standard firebricks, per cooker; cut one with a masonry blade so a tight circle of bricks forms around the cooker floor. Cut a sloping piece of brick (from the one already cut to form a tight ring) that will fit inside the pipe bottom to fill the gap between it and the cooker floor. A thin firebrick has to be cut in half widthwise for the front of the fire grate to rest on at the front of the cooker.
Buy a 17 inch diameter Weber fire grate (for each cooker) from a big-box building supply store.
Strip exterior barrel paint from where the shroud will cover it. Mineral oil can be used on this exposed surface, but only after painting is completed. Rough-up the remainder of the paint then repaint using either high-temp engine (any color you want) or stove black spray paint. The shroud should be in place when painting.
Rims from the cut-down drum can be flattened and welded together to make coal flickers that are used down the fuel/flue pipe.
Out-of-pocket materials and supplies are about $240.
Contact me if you need assistance. Cooker mechanisms and usage are covered in other posts. If you want to see more now click here. Make sure to see all 30 or so post on the Barbecue Chubs and related meat tricks Facebook page.
Material list for one cooker:
-1 1/2 new closed-end 55 gallon steel drums, uncoated interior
-One 28 inch long piece of 3 inch ID schedule 40 gas pipe
-12 full size firebricks and 1 half thickness firebrick.
-1 deep-dish cast iron (5 inch by 10 inch) pan.
-3 cans of either stove black or engine spray paint
-One 17 inch diameter fire grate
-Approximately 30 feet of 1/2 and/or 3/8 inch rebar, depending on your rack configurations.
-1 brass gas fitting that fits the smaller threaded barrel opening on one end and has a 3/8 inch ID copper compression fitting on the other.
-Approximately 26 inches of 3/8 inch OD, type L copper tubing